Showing posts with label 3-D item. Show all posts

Monday, August 25, 2014

Cow Pillow Box

cowpillowbox

Time for another CHF challenge over at the Cornish Heritage Farms Blog.  This week the challenge is hosted by Irit. This time round our challenge is to create Anything but a Card.

I used Cow 1 digital stamp and the digital sentiment that went with it from CHF and made a Pillow Box. Colored the cow with copics, cut it out completely and added some prima flowers for it to stand in.

cowpillowbox

To play along, create a card using CHF images. You can use either CHF digi or rubber stamps to create a card or project.... anything you like as long as the stamps are Cornish Heritage Farms. (Yes, they can be older stamps.)

Once you have created your card/project head over to the CHF blog and place a comment with a link to your card/project so that we can see what you created. If you upload your card/project to SCS don't forget to include the keyword CHF60. We can't wait to see what you create!

Don’t forget to check out the rest of the Design Teams blogs today so see what they created for this challenge.

  • Amber Hillman
  • Ann Marie Saunders
  • Irit Shalom
  • Kelly Santi
  • Kristine Reynolds
  • Maureen Russell
  • Steph Ackerman

  •          Thanks for stopping by!


                             Amber

    Thursday, August 21, 2014

    1st day of school

    postitnoteholderschool

    What is that noise? Don’t you hear it? What, you don’t? Wait, neither do I as it is so quiet this morning. Wait, it must be the first day of school!! No kids around, just me and the dogs!

    So it is time for another CCEE Stampers challenge. What does that have to do with first day of school you say? Well my challenge is to make a card or item that could be given to the teacher on the first day of school or open house night.

    I used this cute little owl stamp from Art Impressions, pulled out my school papers and some cute school brads from Eyelet Outlet and made my daughter’s 3rd grade teacher a Post it Note holder. Also used some school rub ons for the apple, saying and chalk. The chalk board I did with a white gel pen. Ironically they are no longer teaching cursive in our school but I couldn’t resist putting it on the chalkboard. Also added a loop and a pen at the bottom.

    postitnoteholderschool


    And here is my 3rd grader all ready and waiting on the bus. She was so excited for school to start because she finally gets to get on the bus all by herself as brother has moved up to middle school. (which I completely forgot to get a picture of this morning as a. it was way too early, b. bus was running late and c. he was a nervous wreck, not sure he would have liked me trying to get his picture so I shall get it when he gets home!)

    1stday

    Don't forget to check out the CCEE Stampers blog to see the rest of the creations the CCEE Stampers created this week. You can also see more details of their creations on their individual blogs:

    And feel free to play along with us. We’d love to have you.


             Thanks for stopping by!


                           Amber

    Tuesday, October 22, 2013

    Trick or Treat

    Treatscopy

    It is my turn to post over at Craft-Dee BowZ but I had to share it here with you too. Donna gave us a theme of Halloween and a non card at that!

    I know you have seen a few Halloween cards from me but really we don’t do Halloween. Yes, our kids do dress up but for a Harvest party and they are not allowed to dress up as anything scary so you see a lot of princesses, army guys, puppy dogs, cotton candy (my middle went as last year), paper doll (my youngest last year). Any ways I digress….Back to this challenge Donna gave us.

    Halloween… non card…. what to do? I like to send goodies to work for hubby’s coworkers so why not decorate a container that he could put on his desk with some kind of treat in it for them?

    Took some of the ribbon Donna sent us and made a triple loop bow by doubling up my ribbons. Instead of just laying the ends of the ribbon around the container, I decided to twist the two ribbons together.

      Using a spider web die, I cut out the spider web and attached it just by the corner. If you look closely you will see a small little spider (sticker) on the web. Printed out a pumpkin digi image from Paper Pretties that I colored and added in the corner. Attached the little sign to the container so everyone would know they could have a treat.

    Now what to fill the treat container with? How about Pumpkin Oreo Muddy Buddies? Oh my gosh! I didn't think I was gonna have any left to put in the mini baggies as this stuff is just that good! Tied each baggie up with some ribbon that I had (keeping with the black/orange color theme).

    Close up of the Pumpkin Oreo Muddy Buddies.

    halloween1copy

    But what you are really saying is “Amber!! Stop teasing us and give us the recipe!!” I can’t take credit for the recipe as I got it from Something Swanky blog which I found via Pinterest.

    Pumpkin Oreo Muddy Buddies

    Ingredients

    • 2 cups Pumpkin Spice Hershey Kisses
    • 7 cups Chex Cereal
    • 1 cup crumbled Oreos
    • 1 1/2 cup powdered sugar

      Instructions
    1. In large microwave safe bowl, heat the Hershey Kisses for 45 seconds or until melted. Stir until smooth. Add the cereal to the bowl, a few cups at a time, stirring gently and coating the cereal as you go.
    2. Add the Oreos to the bowl, and stir gently to coat.
    3. Place the powdered sugar in a gallon sized zip top bag. Spoon the coated cereal mixture into the bag. Seal the bag, and shake to coat the cereal mixture.
    4. Serve immediately or keep sealed in bag, and store for 3-4 days


      .Don’t say I didn’t warn you on how good this is! 


              Thanks for stopping by!

                         Amber


    Wednesday, August 14, 2013

    Teacher Post-It Note gift

    This week’s Paper Pretties challenge is Back to School Inspired because it is that time of year again! (Doing the happy dance here.)

    I made a Post-It Note holder to give to one of the teachers during Open House. Really simple to make. I got my directions from The Crafty Blog Stalker and decorated the front how I liked.

    I used Bookworm Polly and colored with Prismacolor Pencils and blended it with odorless pencils. Cut Polly out completely and attached with dimensions. #1 Teacher comes from Thank You Teacher Sophia.

    AmbersBacktoSchool

    How to Enter: If you would like to play along with us, all you have to do is create a card/project using the above challenge and upload it to your blog and/or to your SCS Gallery using the keyword PWC271.

    Don’t forget to include a link to your card on the Paper Pretties Blog, so everyone can see it too. You don’t have to use Paper Pretties stamps to play, but of course if you have them we would love to see you use them. One random participant will receive a Paper Pretties Stamps set … see the Paper Pretties Blog for more details.

    ~~~~~~~~~~~~~~~

    Just an FYI….Craft-Dee BowZ Blog Hop is happening starting tonight at 10:00 PM! Don’t forget to stop back by starting at 10:00 pm EST tonight for your chance to win a fabulous goodie!


              Thanks for stopping by!


                           Amber

    Friday, May 10, 2013

    Day 5 - ad-“mitt”

    ovenmitts

    Today is the last day of Teacher Appreciation Week. Have to
    ad-“mitt” you will like this one. I wondered around the Dollar Store finding items for this gift. (sad to ad-“mitt” that their mitts were so much cuter than Wal-Marts!)
    The top three went to the Middle School for Teacher Appreciation Day but I couldn’t post them till now as my younger kids took them in today to their teachers. (and we didn’t want to spoil it for them, now did we?)

    Isn’t this the cutest idea? Get an oven mitt and fill it with goodies. I filled them with pencils, pens, candies. The middle school ones got nail files and big chocolate bar while the elementary ones got glue sticks and lotion (since they got a big chocolate bar yesterday).

    (hoover over a picture to pin it)
    ovenmitts

    Used the Craft-Dee BowZ to make my bows.
    ovenmitclosup
    This time around I didn’t make my own tags but used this Download. Feel free to use them.
    See Teacher Appreciation Week for the other gifts we gave the teachers this week.


                Thanks for stopping by!

                         Amber

    Thursday, May 9, 2013

    Day 4 - You deserve…

    candybar2

    Day 4 of Teacher Appreciation Week brings us fun little gifts that could work for anyone but for today it they are going to 1st and 4th grade teachers.

    Take a chocolate bar (any flavor and any size, I used an X-Large Hershey’s Chocolate bar) and wrap them in design paper. Attach some ribbon how ever you would like and attach the saying. Isn’t this cute? I used the Craft-Dee BowZ maker of course to make the bows.

    candybar1

    candybar2

    See Teacher Appreciation Week for the other gifts we have given the teachers this week so far.


             Thanks for stopping by!


                         Amber

    Tuesday, May 7, 2013

    Day 2 - Sweet goodies

    sundaes

    Welcome to Day 2 of Teacher Appreciation Week. Today is actually Teacher Appreciation Day so today we have some sweet and not so sweet goodies to share that my kids are taking in for their teachers.

    First up is my favorite one by far, Bath Salt Sundaes. All you need is an ice cream cup, bath salts, a bath pouf, a straw and a cherry of course.

    sundaejpg

    I found my cups at Goodwill for 69 cents! Since I wanted them to be able to use the cups again, I lined the inside with plastic wrap before adding the homemade bath salts.  Yes, I said homemade bath salts.

    Using a mixture of baking soda, kosher salt and bath beads, I made my own bath salts. Attached a white bath pouf on top of the “ice cream”. Now for the cherry….well it should be a bath bead but I couldn’t find any but I did find Sour Cherry candies so that is what I used!  Attached a little tag to the straw and there you have it… a Bath Salt Sundae.

    sundaes


    The tag reads:

    This very special sundae,
    will leave you feeling great.
    It's chock full of good things,
    even though it can't be ate.
     
    Take it in the bath with you.
    Of course don't take a sip,
    cause it may look delicious,
    but it's made to take a dip.

    Note: place straw in cup before adding bath salts. Can buy bath salts instead of making them. Body Poufs & straws were found at Dollar General for $1.00 each. Candies were found at Family Dollar.

    ~~~~~~~~~~~~~~~~~~~~~~~~

    Next we have a special treat for a middle school male teacher. Some Chocolate Coconut Cookies. What makes these so special? No flour or refine sugars are in them which is what this teacher is trying to avoid. Hope he enjoys them.

    smartcookiesajh

    Here is the recipe I used. Just a little note, if your mixture is a little runny, add some more coconut. I did not try adding the raspberries this time.

    image_1367288318495955

    Hope you have enjoyed day 2. Don’t forget to come back to see what tomorrow holds!


               Thanks for stopping by!


                           Amber

    Monday, May 6, 2013

    Day 1 – O”fish”ally

    gummyFish

    Today is the first day of Teacher Appreciation Week. This year I decided to give the teachers a little something every day.

    So for the first day we have ‘You are o”fish”ally the best’ little baggies filled with Swedish Fish. I designed and printed the saying, layered it and used deckle scissors to cut it out. Used some pattern paper layered on blue cardstock that I used deckle scissors on for the topper. Add a bow to each one using the Craft-Dee BowZ to make them.

    gummyFish

    A close up of the two different bows.gummyfishbluebow

    gummyfishgreenbow


                Thanks for stopping by!

                           Amber

    Thursday, April 25, 2013

    My Pinterest Inspired Photo Wall Clock

    PhotoWallCloseupajh

    I’m a big Pinterest junkie. I mean, come on, who isn’t? I only have 35 boards, 3,504 pins! Which is a lot of pins to try out/be inspired by but I am going to try, at least most of them… slowly but surely! But today’s post I think has to be my favorite Pinterest inspire of all. (Feel free to follow me by clicking the button on the side.)

    Since moving in to our own home almost 2 yrs. ago, we still have the living room/dinning room and hallway to repaint and decorate. Finally got to the living room/dinning room over Spring Break last month and just finished it up this weekend with what I am sharing with you today. Of course I had to look on Pinterest for ideas and in doing so, found this idea:

    ff0d68309605bcc366d6e64644ca148b (clicking on picture will take you to the blog)

    I pinned it right away (36 weeks ago that is) as I knew this was exactly what I wanted to do in my living room. But first I had to paint! Below is what the room looked like before and after. (and yes, that is another Pinterest inspired item under the mirror. When it gets completely finished, I will blog about that too!)

    freshpaint copy

    I painted 3 walls in the Frosted Morning color (has hues of purple in it depending on how the light hits it) and the accent wall a deeper shade of purple.

    I knew with the walls painted the Frosted Morning, I wanted a pop of color here and there on the walls but also the stark black too. So in doing my clock, I made sure my word decal was black and my frames were black to leave the color pop up to the pictures.

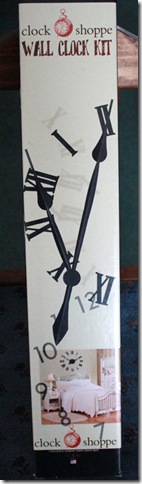
    To get the dimension of the clock, I went with finding the hands first as I did not want to get a decal and it be over powering in size to the hands of the clock or vice versa!  I found my wall clock kit at Hobby Lobby for $39.99 but of course used the 40% off coupon they offer on their website!
    clock

    Then began the fun search of that perfect word decal that would fit our family. I searched high and low and finally found one on Ebay. (Good ‘ole Ebay!) You could also make your own decal as the original pinner did. What you are seeing in the middle of the saying is the clock base. We put that on to center the wording around it. (yes, I had to cut the decal apart some to make it work how I wanted it to)

    1366637153406

    Then came time to position the “numbers” around. Lots of measuring, painters tape, rearranging till the faux frames were how I wanted them.
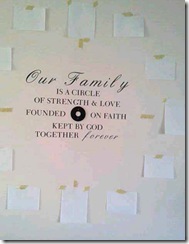
    1366637153406a (no, clock is not crooked, both of these pictures were taken with my phone at not a good angle!)

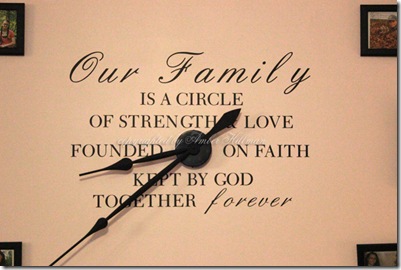
    Here is how the saying looks with the hands completely in place.
    WallClocksaying copy

    For me the hardest part was picking out what pictures to use! Thank goodness I only have four kids as I used (from the oldest to the youngest) them individually as the 12, 3, 6 and 9. Which we put in 5x7 frames to make those “numbers” stand out and the rest of the “numbers” used 4x6 frames. (you can use any size you want really) After that I put up another picture of each child with something that represented them. The final four pictures are then group shots of the kids and one family shot.

    PhotoWallclockajh

    I didn’t want to have to put too much money into the picture frames and thought I would find a good deal at the Dollar Store. No such luck here but lo behold, I found them at Wal-Mart, frames for 94 cents for the 4x6s and a $1.00 for 5x7s!

    PhotoWallCloseupajh

    I am so loving my Photo Wall Clock! Can’t wait to change out the pictures in a few months time or sooner as that is the beauty of this idea, it will be forever changing! (No pun intended! lol) Graduation pictures, sport pictures, goofy, holidays, birthdays, weddings, and so on!

    Incase you were wondering, this is how the Dinning room wall was decorated. (sorry, not Pinterest but Ebay.)

    wallajh


    Hope you have enjoyed my (long) post today on one of my Pinterest Inspirations. Next will be my curtains when I can get to them! Excited about them too.


           Thanks for stopping by!


                      Amber

    Wednesday, March 20, 2013

    Espressoly for you

    AmberglitterDulcecopy

    Happy first day of Spring! Well I think it is Spring as it is pretty cold here. Not Spring like weather at all.

    But it is time for another Paper Pretties challenge and this week it’s all about Glitter!

    I used a new digital set this week Illustrated by ARTish – Dulce. Colored Dulce with copics. Added some white gel pen to the water for some highlights. Added stickles to the coffee cup wrap and used design paper that has glitter on it. But why the slits on the sides of the card?

    AmberglitterDulcecopy

    It’s a Slit Latch Gift Card Holder! Here is what the inside looks like. Our neighbor plowed our driveway all winter long so this is for him as a thank you. Dulce is perfect for this gift card.
    Amberglitterdulceopencopy

    How to Enter: If you would like to play along with us, all you have to do is create a card/project using the above challenge and upload it to your blog and/or to your SCS Gallery using the keyword PWC250.

    Don’t forget to include a link to your card on the Paper Pretties Blog, so everyone can see it too. You don’t have to use Paper Pretties stamps to play, but of course if you have them we would love to see you use them. One random participant will receive a Paper Pretties Stamps set … see the Paper Pretties Blog for more details.


                 Thanks for stopping by!


                                 Amber

    Wednesday, February 6, 2013

    Craft-Dee BowZ first blog hop

    hairbow copy

    Welcome to the first ever Craft-Dee BowZ Blog Hop. This months blog hop is featuring a Valentine theme. If you hopped here by way of Patti’s blog  then you are in the right place!! Otherwise you might wish to start at the Craft-Dee BowZ blog to become eligible for a Craft-Dee BowZ tool and a spool of beautiful ribbon.

    We were given three different types of ribbon to use for this blog hop. As soon as I saw the ribbon, I knew what I wanted to do. I used the wired heart ribbon as my base and made a 4 loop bow as big as the Craft-Dee BowZ would go. Then I took the white lace and again made a 4 loop bow but a few sizes smaller. Lastly I took the polka-dotted ribbon and made a 2 loop bow with tails just a size smaller than the lace.  Glued them all together to get this:

    hairbow copy
    After the Helmar 450 glue had dried, I glued it onto a small barrette.

    Here is another shot not so close up. Can’t wait for Valentine’s day for her to wear this to school.

    hairbow1

    Now head on over to Barbara’s blog to see what she has made using the Craft-Dee BowZ. And don’t forget to comment along the way to be entered in the drawing for a Craft-Dee BowZ tool and a spool of ribbon!


             Thanks for stopping by,

     
                         Amber

    Friday, August 10, 2012

    OCL/May Arts Back to school survival kit

    oclbanner1

    Today is our last day of the Our Craft Lounge and May Arts week. It is also challenge time over at The Lounge and of course the challenge is ribbon!

    So school starts next week for us and I made a special gift for a very special friend but don’t want her to know what it is so, Kyla, if you are reading this.. stop right now. Everyone else continue on as I am loving what I created. (which is always a good thing if you can love your project so much when you are finished that you don’t want to give it away.)

    Anyways, Kyla’s baby starts Kindergarten this year. I know she is dreading it but yet happy for him. I wouldn’t be surprised if there are a few tears shed so I made her a Kindergarten Mom’s Survival Kit.

    I saw this basket on Pinterest and couldn’t wait to make one. For directions on the basket, visit Rachel Ricks’ blog the little blue room. I used core’dinations The Chocolate Box for my basket. Sanded the the brown side to get some blue to show through, distressed the blue pieces with distress ink. Attached tag with May Arts twine which I also used on a note that I stuck in the basket.
    kylabasketajhcopy

    A peek inside the basket and we see tissues, kisses and a note. Also a close up of the tag using The Art of Nature set.
    kylainsideajhcopy

    A close up of the May Arts trim that I adhered to the inside of the basket.
    kylaclosupajhcopy

    Another shot of the inside of the basket to see what the trim looks like from the inside. Isn’t that trim cute?!
    kylainside

    So what makes this basket a Kindergarten Mom’s Survival Kit? This note (that I also found via Pinterest) that is included in the basket is what makes this entire kit special. I typed up the note in Photoshop, adjusting font size etc. and then printed it on printer paper and stamped The Art of Nature on it which I colored in with Prismacolor pencils and blended with odorless mineral spirits.
    kylasnotajhcopy
    *This note does not have to be just for a kindergarten mom but for any mom with a child heading back to school. Just change the title to fit the grade you need.

    I hope this basket brings Kyla some comfort on that first day her baby heads off to school.

    Don’t forget to comment on all my OCL posts this week (I was able to get one up yesterday) to be entered for the prizes!

    At the end of the week, OCL will pick 5 winners for some awesome May Arts/OCL prizes!  But you can’t WIN if you don’t PLAY!

    Same as last week, to win you have to COMMENT!  So leave a comment here, at the OCL Blog, the OCL Facebook page and the blogs listed below all week for a chance to win the CANDY!  The 5 winners will be picked from all of the comments this week.  The deadline is Friday, August 10 at 3AM (EST)/midnight (PT).  The winner will be announced on Monday, August 13th on the OCL Blog!  Be sure to check out The Lounge for the first two days of this party as I didn’t have a chance to play but I am playing again on Friday!

    Amber Hillman ---- That’s me!

    Debbie Fisher

    Kendra Wietstock

    Deb Felts

    Lori Barnett

    Tammie Edgerton

    Michelle Pearson

              
             Thanks for stopping by!


                           Amber

    Thursday, August 9, 2012

    OCL/May Arts Christmas Tag

    oclbanner1


    I had a day off yesterday so I got to create all day long for today! Of course the biggest project I worked on, you will just have to come back tomorrow for my last blog post for May Arts/ Our Craft Lounge blog week. I’m so excited to show you!

    But for today I have not one but two projects to show you! I needed a quick card to send out in the mail just because so I used the fun pom pom ribbons from May Arts in three different colors and stamped a sentiment from The Pond in white. Cute, simple, quick and just in time to get it in the mail!

    threeribbonajhcopy

    For my second project, I was in the mood to make something Christmassy. The green and red ribbons were just screaming to me: Christmas! So of course I listened and made a tag using Merry Wishes. I used the ribbons to look like a gift on the tag. Is it bad to have a gift on a gift? lol Green hemp also from May Arts was used to hang the tag.
     
    christmastagoclmayartscopy


    At the end of the week, OCL will pick 5 winners for some awesome May Arts/OCL prizes!  But you can’t WIN if you don’t PLAY!

    Same as last week, to win you have to COMMENT!  So leave a comment here, at the OCL Blog, the OCL Facebook page and the blogs listed below all week for a chance to win the CANDY!  The 5 winners will be picked from all of the comments this week.  The deadline is Friday, August 10 at 3AM (EST)/midnight (PT).  The winner will be announced on Monday, August 13th on the OCL Blog!  Be sure to check out The Lounge for the first two days of this party as I didn’t have a chance to play but I am playing again on Friday!

    Amber Hillman ---- That’s me!

    Broni Holcombe

    Debbie Fisher

    Kendra Wietstock

    Lori Barnett

    Melissa Cash

    Tammie Edgerton

    Stephanie Serrano

    Michelle Pearson

    Debbie Corbari


             Thanks for stopping by!


                           Amber