
Today’s post is a combination of day 5 and day 6 as I was so busy yesterday with another project I didn’t get to yesterday’s class until late last night (or was it early this morning?)
So Day 5 was learning how to add textures to our pictures. The bonus challenge was to add a frame to the picture after adding the texture. I tinted my picture first to a sepia tone before adding 3 layers of different textures! The frame was added using a soft light. Of course I had to use word art again!
My mom took this picture of my Jorden, 3 yrs old, and my niece who just turned 4 this weekend. These two are best buds. 
Day 6 had us working with TTV. As Jessica puts it “a really fascinating concept in photography circles, called "Through the Viewfinder". To get a worn, faded look, photographers will actually take photographs (often using a macro lens and a light blocking device) through the viewfinder of an old camera. The result is a photo with blackened edges, distortion, scuffs and scratches and marks - pretty much what we've been looking for all our lives, right?”
So today we had to add a TTV texture and then anything (and everything) from the previous classes to our picture.
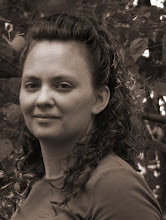
Once again I used a picture of Jorden that mom just took. (no, her hair is not that curly. for some reason she wanted it curled that day.) Added my texture and then added word art.
Notice how the “spoiled” is the same as above? That’s because it is the same word art.. I just erased the other wording to get just spoiled for the above picture!

After I had done this one, I realized I hadn’t added the frame from yesterday as I was going to do that. So here it is with the frame and once again I made the frame a soft layer. 
And then I had to do this one as I just love the saying. I used a different TTV texture here.
Once again thank you for looking and following along with me during this class. Have a great weekend!


0 comments:
Post a Comment